Thursday, September 22, 2011

Dutch Oven Cooking

Tonight I had my husband teach me how to use our dutch oven.  It was defiantly WAY easier than I had thought it would be.  In the end I think I will have my father-in-law come over and help me.  :) 

When using a dutch oven there are different things you need to do with it.  Treat it like you would any cast iron.  To clean  your dutch oven NEVER use soap in your dutch oven. After you have cleaned it stick it in a warm oven for a little while.  When it comes out spray pam on it and let it dry.  If you dont use your oven for a while stick it in your oven through a cleaning cycle and it will burn off any smell or any other bacteria that has gotten into it. 


Dont use metal utensils.  They can/will scrape off the cast iron.  That is what I know for now.  When I have my father-in-law come down I will ask him some more questions and post more about using your dutch oven.  There are so many websites out there about dutch ovens.  Check them out.  There is tons of useful info out there.

Tonight we made a cherry cobbler.  I will give you the recipe and tell you how to put it together.  Please dont get scared off when you see how hard it is! 

Cherry Cobbler

1 can cherry pie filling
1 10oz sprite or 7up can
1 box cake mix (any flavor you like)

Dump the cake mix into the dutch oven.  Pour in the soda and stir.  Not much, just for a few seconds.  When you are done with that open the can of cherries and evenly poor them over the cake mix.

Thanks it!  Oh, cook it for about 1 hr.

I really was surprised how easy it was to prepare the oven and cook in it.  Now, depending on how big your oven is will depend on how many briquettes you will need.  The one we used was a 10" so we needed 20 briquettes.  10 on top, 10 on bottom.

We took an empty #10 and poked holes in the bottom so there would be oxygen for the fire.  After we poked the holes we used a can opener to take the bottom out.  We placed a piece of tin foil on the cement outside and the "shell" of the #10 can on top of that.  We then put 20 briquettes in the can.  Lit them and waited for them to turn white.  While we waited we added the ingredients for the cobbler.
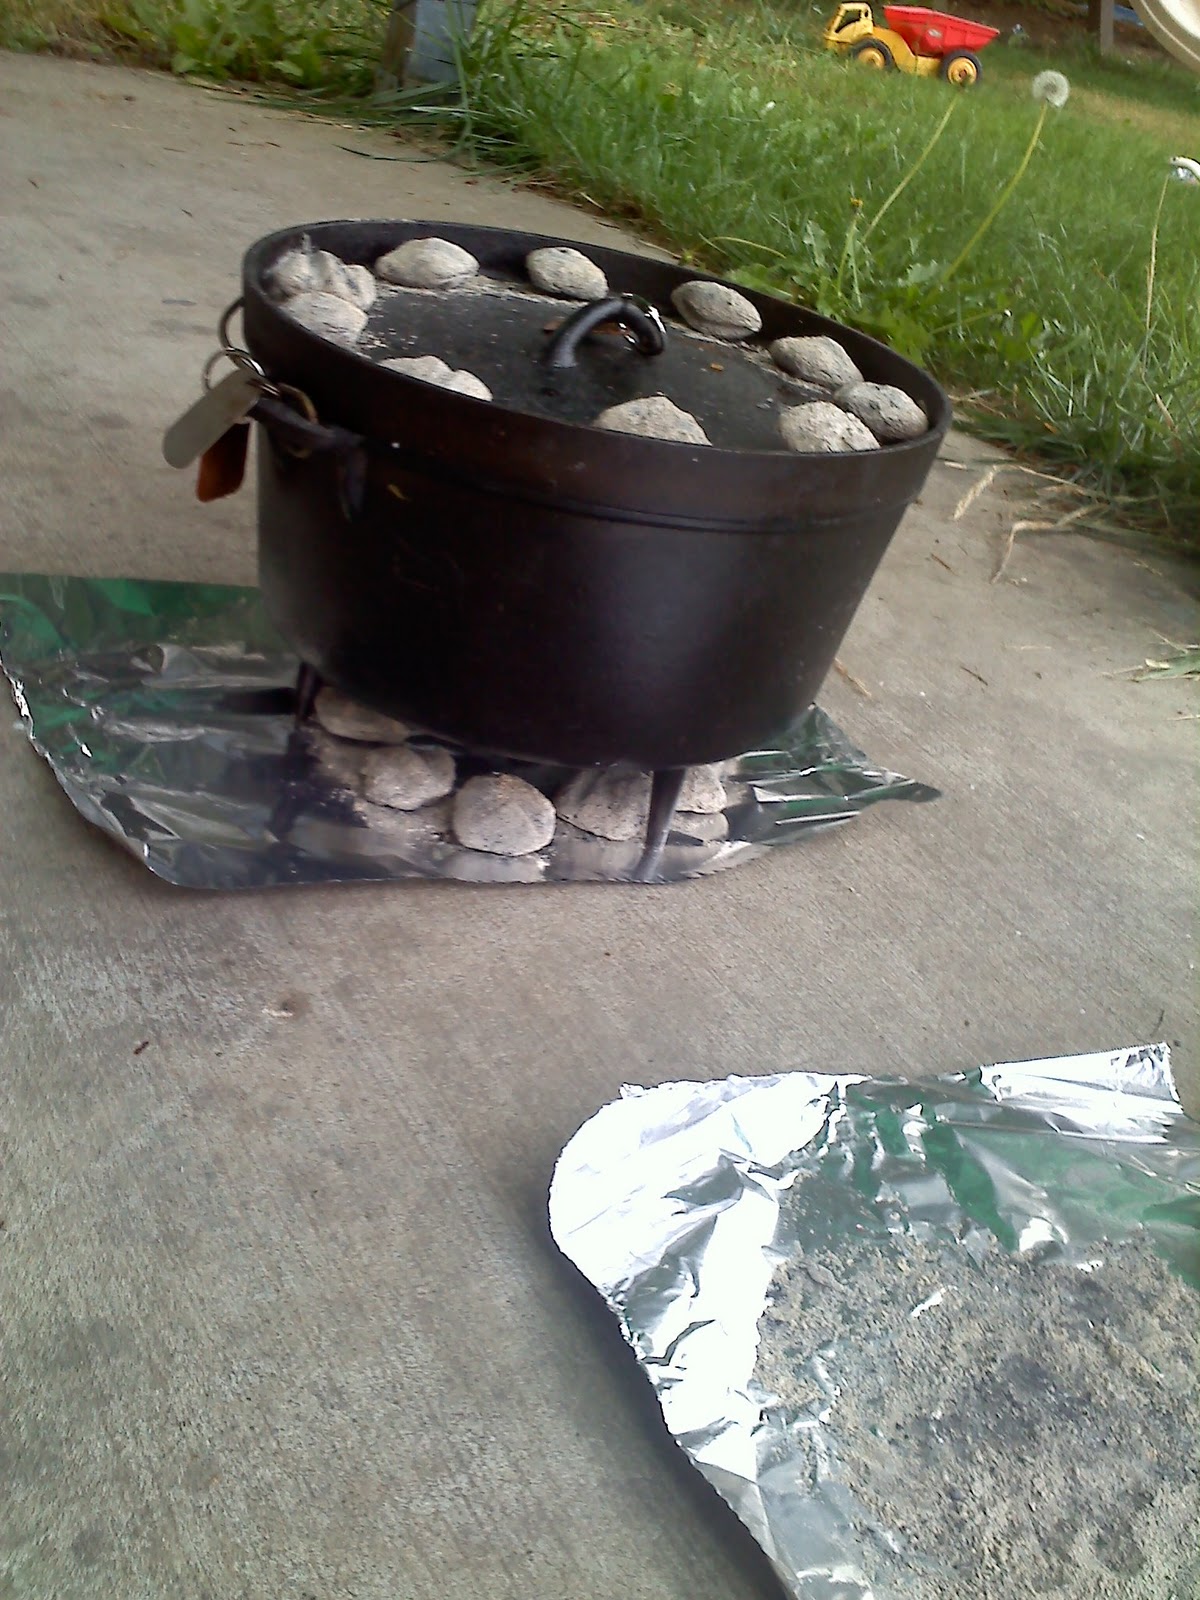
We also put tin foil underneath the dutch oven just so we wouldnt get any burn marks on the ground.  When the briquettes were ready we evenly placed 10 underneath the oven around the outside.  If you pile the briquettes in the middle the middle of your food will burn.  So evenly place them around the outside of the oven and you should be good.

Then we did the same thing on the top.  After those were placed we built walls with tin foil just to block the wind.

We then waited an hour and we had cobbler.  I think next time we will cook it just a few minutes less but it was still good.  You can change up this recipe simply by changing the fruit or the cake mix flavor.

Over all I think it was successful.  I can do this on my own now and if we didnt have any power we will be set.  We will have lots of cobbler.  I guess I need to learn how to cook other things now.  :)

Sunday, September 18, 2011

Powerless Cooking

This is one topic/storage area that I am really lacking in.  I have a few propane bottles with camp stoves that we can use but other than that I have nothing.  I have heard wonderful reviews on the sun ovens.  There is one big downfall with them...you have to have sun.  I live in the NW so as you know, that means we have very little sun.  I do have 2 wonder boxes and I KNOW how to use them.  Now that is good thing if I am in the middle of cooking and the power goes out.  Or I can use my propane stoves just enough to boil my water and then finish off with my wonder box.  To learn more about the wonder box click here to see a previous post.

My in-laws did give me a dutch oven but I have no idea how to use it.  I think this week I will have my husband teach me how. 

Where I live we tend to loose power in the fall and winter.  Typically its not for very long or even at dinner but you NEVER know!  Its better to be prepared BEFORE something happens.

What do you have for powerless cooking?  Do you now HOW to use it?  What are your thoughts and ideas?

Thursday, September 15, 2011

Coming soon!!!

I am super excited to announce that I have been approached by a great company called My Memories to host a giveaway and a review of their product.  My Memories will be giving away to one lucky reader their My Memories Suite software for FREE, a $40 value.  I will post soon on the detail of the giveaway. 


My Memories is a great online company that has all of your digital scrap booking needs covered!  Once you create your digital scrap book you can then share it with your family and friends.  What is so great about this software is that you have no clean up and you dont have to spend tons of money on scrap booking supplies.  I have downloaded their my memories suite and LOVE it!  I will be posting my review in the next week or so.  I hope to have my Hawaii scrap book done by then to share with you.

In the mean time if you want to get started on your scrap booking My Memories has given me a coupon code to share with you.  Using this code at check out you will receive $10 off your software. 

Use this code  STMMMS19059

I know you will have fun with this software.  I sure have!

Monday, September 12, 2011

What will your kids do if you are seperated....

I have been watching show after show the last few days about 9/11.  They have been so interesting and sad.  Its hard to believe that it has been 10 years now.

While watching one of the shows it was talking about parents who were on Staten Island when the twin towers were attacked.  I did not see this part, my friend did, she said that people were not allowed into down town Manhattan.  Some of the people who were stuck on Staten Island had kids in day cares in down town Manhattan.  They were stuck for days so the day cares had to keep the kids.

Have you ever thought about what would happen if a natural disaster struck and you were separated from your kids for an extended period of time.  I have!  My 2 oldest kids go to school across the river.  If Mt. St. Helens were to blow, if we had an earthquake, if we had major flooding....all of which are very possible here....I would NOT be able to get to my kids.  We have talked to them and they know that if something were to happen and I was not able to get to them they are to go to my parents house.

It is important to come up with a plan for your kids NOW, not later or when a disaster strikes.  Your kids NEED to know what they are supposed to do and where they are to go.  Not every one is going to have family by them.  Find friends, church members or someone you trust with your kids.  Talk to them.  Come up with a plan.  You dont want a disaster to strike and just have your kids show up at their door.  

Now that you know who is going to take care of your kids they need to make sure they have enough food and water for your children as well.  It wont do much good if there isnt enough food or water for them.  The same goes for you if you will be having other peoples children come to your house.  Make sure you have enough as well. 

Make sure your children are comfortable with these people.  If they are going to be away from you for a few days they are going to be upset and if they dont know who they are staying with it will only make things harder on everyone.

One thing that I dont have but will be working on very soon is a school 72 hr pack for my kids.  I KNOW that my parents have enough food and water for my children.  BUT what if they are stuck at school.  The school isnt going to have a lot.  Every little bit you can do to help your kids will help!  It doesnt have to be a lot.  Just some water pouches and food bars will do.  I would also add a small first aid kit.

I have learned a lot by watching the History Channel the last few days.  I have been thinking a lot about our 72 hr kits.  I have been working on them for a while now but they are not complete.  The shows have given me different ideas on things to put in them.  I dont have masks.  Something that is needed as I`m not too far from Mt. St. Helens.  If she erupts we WILL need masks.  Gloves, what if you are stuck and need to dig yourself out.  Think about what kind of natural disasters happen where you live and plan accordingly. 

September is National Emergency Preparedness month.  What a better time to get prepared.  There have been so many natural disasters its not a matter of IF...but WHEN something happens.  Its better to be prepared now.  If you wait until something has happened or is predicted the shelves at the stores WILL be wiped out with in hours if not sooner.

Sunday, August 28, 2011

Homemade Bagels

Bagels formed
I just learned that there is nothing better than homemade bagels!  My kids are even fighting over them!  I was trying to take a picture and my kids were hovering over them waiting to be the first one to get a bagel.  I dont blame them though I was thinking the same thing!

These are very easy to make.  I am all about easy.  They came out with a nice crunchy outside and a soft inside.

Homemade Bagels

4 1/2 c. flour (any mixture of white and wheat will work)
1 1/2 c. warm water
Bagels after rising
2 pkgs yeast (4 1/2 tsp)
3 Tbs. sugar
1 Tbs. salt
1 Tbs. honey
1 Tbs baking powder

Toppings (optional):
cinnamon raisin (I would add to dough)
dehydrated onions
parmesan cheese
shredded cheese of choice
really any toppings you like you can add to these.

Bagels in boiling water
Combine 1 1/2 c. flour, water, yeast, sugar & salt.  Mix for 30 seconds on low and the 3 minutes on medium. 

Mix in 1/2 c. of flour at a time until the dough becomes stiff.  About 2 1/2 c.  The recipe says to use remaining flour to knead for 7 minutes on the counter with.  My dough was too firm to knead so I just let it knead in the mixer for 7 minutes. 

Cover and let rise for 10 minutes.

Shape and place on a greased cookie sheet.  Tip for forming: pinch the ends together well or they will come apart when they rise and boil.  As you can see I found that out on a few of mine.  Let them rise for 30 minutes.

Preheat oven to 350.

Finished
Bring a lg pot of water to a rolling boil.  Add honey and baking powder.  Add the bagels to the pot 3 or 4 at a time.  Simmer 7 minutes flipping over half way through.  Remove with a slotted spoon and place on greased cookie sheet. 

If you want to top bagels brush with egg wash and then top.  Bake 25-35 minutes or until golden brown on top.


My kids are STILL fighting over these.  My 6 yr old wanted to give one to a friend he is playing with and my other kids are yelling at him.  I have very picky kids so for them to go to this extent really says a lot!

Freezer Cooking

A good friend of mine and I have been wanting to do some freezer meals for a long time now but just didnt know how to go about it or where to start so we never did anything.  Unfortunately she moved a few weeks ago.  A few weeks before she moved we had a new family move into my neighborhood who also goes to our church.  That family.....well the Mom.....has been doing freezer meals for about 10 years now.  I did not find this out until my other friend had moved.  :(  This new friend who just moved in has offered to help me learn how to make/do freezer meals.  She has HUNDREDS of recipes!  She knows what freezes well and what doesnt.  I am so excited to learn from her.

She gave me a packet that she made with tips on how to make freezer meals.  It had a few recipes in it so decided to try 2 of them on my own.  The first one I made was breakfast burritos.  I forgot to take a pic sorry!  They were so simple yet so delish!  The second one I did was a chicken broccoli bake.  This was oh so delish!  I cant even tell you how good it was.  I did make a few changes to the recipe which I will note below with the recipes.  I did manage to get of pic of this one but not until after it was in the freezer and frozen.  I am going to be making meatballs some time this week and will post when I get those done.

Breakfast Burritos
1 # bacon cut into 1/2" slices (I would have used 2 #)
1 lg onion ( I LOVE onion and bacon together so I would have used 2)
lg roll/pkg of sausage (I used Jimmy Deans big roll)
2 1/2 dozen eggs (I used 1 1/2 and had extra but we dont like lots of egg)
1 c. milk
salt 'n' pepper
1/2-1 # cheese grated
24 flour tortillas (about)

Cook the bacon and onion until the onions are nicely caramelized and bacon is crispy.  Drain the fat.  Put a paper towel into a bowl and put the bacon/onion on that.  Cook sausage into crumbles.  Place in a bowl.  Beat the eggs with milk, salt 'n' pepper.  Melt 2 Tbs. butter in a LARGE pan.  (I did 1/2 of the eggs at a time to cook quicker)  Cook until eggs are done.  Put into a large bowl. 

Now you will assemble your burritos.  You can do this however  you like.  For ours I put a little cheese, egg, bacon/onion & sausage in each.  You can do just one of the meats in each one or you can mix the 2 together.  I did find that 1 or 2 spoon fulls of each topping was plenty.  Then you just roll them like a burrito. 

I then wrapped them individually in plastic wrap and placed them in gallon size FREEZER ziploc bags.  Make sure you write on the bags BEFORE filling them!  Write what they are, how to reheat them and the date so you know exactly how to use them when the time comes.  Thats it, you are done!

When you are ready to use these reheat one at a time in a microwave wrapped in a paper towel for about 2 min.

Chicken Broccoli Bake
(Makes 16 servings)

1 c. butter
1 c. flour
8 c. milk
salt 'n' pepper
4 c. cooked diced chicken (I will use 8c next time.  Not enough for each.  I would also have cooked with garlic of some sort and salt 'n' pepper)
2 # steamed broccoli
2 # grated cheese

Make white sauce: melt butter in a LARGE pot.  Add flour stirring constantly.  When boils cook for 30 seconds then slowly add milk, mixing constantly with a wire whisk.  Stir till thick.  Remove from heat.

Place chicken into 4 square tin pans or a gallon size freezer ziplock bag.  Divide broccoli among pans or bags.  Pour 2 c. white sauce over chicken/broccoli.  Place grated cheese into 4 equal quart sz freezer bags.  Label and freeze.

To use:  Thaw, bake 350 for 30 minutes.  Serve over cooked rice or spaghetti noodles. 

One thing I would do differently next time is instead of putting the cheese in a separate bag I would have added it to my white sauce to make it a cheesy sauce.  You would basically have the same taste as adding it on top when you are ready to cook it. 

Shelf Reliance`s New Product Line

I am really excited to announce that Shelf Reliance now have 2 new lines.  We have a gluten free line and also a drinks line.  Our drinks line now has 6 different flavors including: Melon Berry Burst, Orange Bliss, Fruit Punch Performance, Mango Passion, Orchard Apple and Simply Peach.

Our gluten free line includes: Quinoa, Amaranth, Millet, Rice Flour and Cornmeal.

Just in case you are not sure what Quinoa and Amaranth is (I had no idea) I will try to explain them to you.  Quinoa sometimes is considered a grain but it is actually closely related to leafy green veggies like spinach.   It is rich in amino acids and protein. When its cooked, quinoa can become a hot cereal, pasta, or side dish. It also can add a rich flavor to soups and salads.

Amaranth makes a great substitute for dishes that call for oatmeal. It can also be used to create rich, hearty soups that will keep you warm on even the coldest winter day.
I cant wait to try these!  They all sound delish!  If you would like to try some of these or have any questions let me know.